| Prev | Next |
Manage Structural Elements
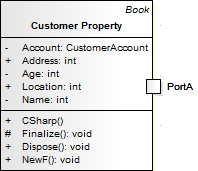
In UML Modeling, you can define certain constructs and events with structural elements (also called Parts, Properties, interaction points or - in the case of Entry and Exit Points on a State element, connection points) that are added on to a parent element. For example, you can add Ports to a Class (as shown), Action Pins to an Action, or Activity Parameters to an Activity. Structural elements become a component of the parent element; certain structural elements (such as Parts and Properties) can exist independent of a parent, but do not have an independent role.
You manage structural elements through the Features window, managing Parts and Properties on the 'Parts / Properties' tab and Ports on the 'Interaction Points' tab. If the parent element is a State, its connection points are shown on the 'Connection Points' tab. All three tabs have the same fields and options, described here.
Access
When you access the Features window, you select the 'Interaction Points' option, which opens the window at the 'Interaction Points' tab. If necessary, select an alternative tab ('Connection Points' or 'Parts / Properties') for the type of structural element you want to examine or create.
|
Ribbon |
Design > Element > Features > Interaction Points |
|
Context Menu |
Right-click on element in diagram | Features & Properties | Interaction Points |
Review Structural Elements
Option |
Action |
See also |
|---|---|---|
|
Defined Elements |
Review the definition of each structural element currently associated with the selected parent element. If you select the 'Show Owned/Inherited' checkbox, the list will also include any structural elements from any classifiers that the parent element has. If you want any structural element to be visible on the parent element on the diagram, select the checkbox next to that element's name. Notice that the 'Visible' column in this panel then shows the value True against each selected element. To hide the structural element on the diagram, clear the checkbox. The structural element still exists on the parent element, but is just not visible in the diagram. |
|
|
All
|
Click on these buttons to select (All) or clear (None) the checkboxes against all listed elements. |
|
|
Show Owned/Inherited |
The tab lists the structural elements on the selected parent element. If you want to include inherited or owner properties from any classifier that the parent element might have, select this checkbox. |
Context menu operations
Right click on the 'Defined Elements' panel to display a short context menu for managing the structural elements.
Option |
Description |
See also |
|---|---|---|
|
Add New |
Click on this option to create a new structural element. The 'Insert New Embedded Element' dialog displays. The 'Type' field defaults to the first in the list of types of structural element you can create for the selected element. If this is not the type you need, click on the drop-down arrow and select another type. Type a name in the 'Name' field or, if you have set up auto-naming conventions, click on the to generate the name. If appropriate, in the 'Stereotype' field type the name of a stereotype to apply, or click on the drop-down arrow and select the stereotype. Click on the . The structural element is now listed on the appropriate Features window tab and is depicted on the primary element, as in the Class/Port example above. |
Set Auto Naming and Auto Counters |
|
Redefine |
If you want an inherited structural element to have different properties from the original structural element on the parent's classifier, right-click on that element's entry in the list and click on this option. A duplicate structured element is created in the list and on the diagram, where the Owner of the structured element is the parent element and not its classifier. You can now modify that duplicate element. (The 'Redefine' option is not available for structural elements directly owned by the parent element.) |
|
|
Modify |
If you want to change a structural element directly owned by the parent element, click on the element entry in the list and click on this option. The element 'Properties' dialog for the structural element displays. Provide any characteristics the element might require, such as Notes, Tagged Values, advanced properties and related files. Click on the to close the dialog and return to the 'Interaction Points' tab. (The 'Modify' option is not available for inherited structural elements.) |
Properties Dialog |
|
Delete |
If you want to remove a structural element from the parent (and therefore from the model altogether), right-click on that element's entry in the list and click on this option. The element is immediately deleted. |
Notes
Learn more

