| Prev | Next |
BPSim - Configure Page
The BPSim artifact will be configured to a package, all BPMN elements under this package or sub packages will be loaded. By default, the package containing this artifact will be configured when loaded into this window.
This window is context sensitive. When an element is selected on the diagram or project browser, the list will show current configurations for element; Besides, the combo boxes will only show available parameters for the element.
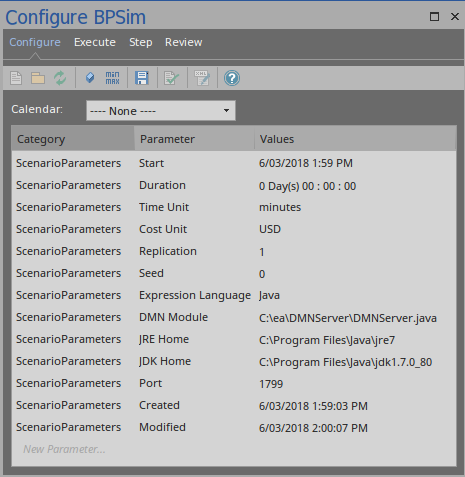
When the BPSim artifact is the context element, the list will show the ScenarioParameters.
Access
|
Ribbon |
Simulate > BPSIM > Open BPSIM Manager, Configure Page |
Toolbar Options
Option |
Description |
See also |
|---|---|---|

|
Click on this button to select/create a DMNSimConfiguration element. |
|

|
Click on this button to set a package for the BPSim artifact. All BPMN elements under this package or sub packages will be loaded. |
|

|
Click on this button to reload BPMN elements from the configured packages. For example, when some BPMN elements were modified, run this command to reload the package so the changes will be taken into account for BPSim Simulation. |
|

|
Click on this button to define Properties, which may be used as Property Parameters on BPMN elements. |
|

|
Click on this button to define Calendars, which may be used to configure element parameters. |
|

|
Click on this button to show/hide the Result Request column. Result Request configuration is required for Custom simulation. The execution report will only contain results that are requested. |
|

|
Click on this button to save the BPSim Simulation window information to BPSim artifact element. |
|

|
Click on this button to validate the BPMN model and the BPSim Configurations. Error/Warning messages may show in the System Output window if exist. |
|

|
Click on this button to export BPMN model with BPSim configuration. This exported BPMN file conforms to BPMN and BPSim specification and may be used by third party BPSim Execution engines. |
Scenario Parameters
A scenario is composed of a collection of element parameters. The scenario itself defines parameters used by all elements as global setting.
Name |
Description |
|---|---|
|
Start |
The date and time at which the process starts to take effect. The user may edit this by overtyping the values or, for the date, by selection from a drop-down calendar. |
|
Duration |
The length of time the process takes. The 'Duration' parameter is a required value. It must be long enough to accommodate a complete simulation; for example, if a process (and hence its simulation) takes three hours to complete, the 'Duration' parameter must be set to a value greater than three hours. The user may edit this by overtyping the appropriate segment with the format of "days hours:minutes:seconds". |
|
Time Unit |
The base unit in which periods of time are expressed in this scenario. All numeric and floating values representing time should be considered as being expressed in that unit unless overridden locally. The user may edit this by clicking on the drop-down arrow and select the unit. |
|
Cost Unit |
The currency unit of any costs recorded in the process. All numeric and floating values representing a cost should be considered as being expressed in that currency code unless overridden locally. The user may edit this by clicking on the drop-down arrow and select the unit abbreviation. |
|
Replication |
Number of replication of that scenario that needs to be executed. Defaults to 1. The user may edit this by simply typing in. |
|
Seed |
A random seed to be used to initialize a pseudo random number generator. The user may edit this by simply typing in. |
|
Expression Language |
XPath 1.0 and Java. XPath 1.0 is the default language. If Java is specified as the expression language, JDK Home must be set. The user may edit this by clicking on the drop-down arrow and select the language. |
|
DMN Module |
When business rule tasks are used in the BPMN Model, these tasks may be implemented as a DMN Model. The user may first create a DMN Model and generate a DMN Server in Java language. Then Click "..." button to specify the generated DMN Server file. |
|
JRE Home |
EA BPSim Execution Engine runs on Java Environment, a JRE Home need to be specified. Use the "..." button to choose a directory. (E.g. C:\Program Files\Java\jre7) The user may edit this by clicking on "..." button to browse the directory. |
|
JDK Home |
When the expression language is Java, EA BPSim Execution Engine will generate Java code and compile with javac as vendor extension. So a JDK Home need to be specified. Use the "..." button to choose a directory. (E.g. C:\Program Files\Java\jdk1.7.0_80) The user may edit this by clicking on "..." button to browse the directory. |
|
Port |
The Port number that EA used to communicate with BPSim Execution Engine. The default port number is 1799. |
|
Created |
Read only field. The timestamp when the BPSim artifact is created. |
|
Modified |
Read only field. The timestamp when the BPSim artifact is last modified. |
Control Parameters
To begin defining Control Parameters,
- Select the element on the diagram, then choose "Control" from Category column in the list
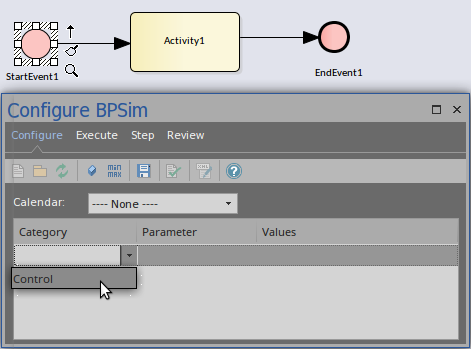
- After the category selection, the combo box in the Parameter column will be filled with all available parameters for the selected element
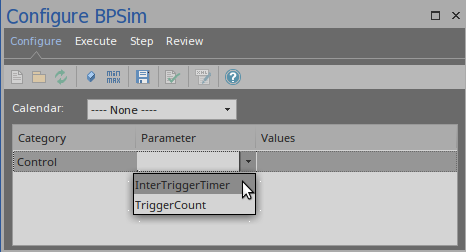
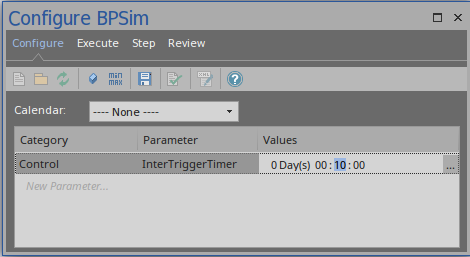
- After the parameter selection, the user may enter the value in the edit or use the "..." button to open the Parameter Value Dialog.
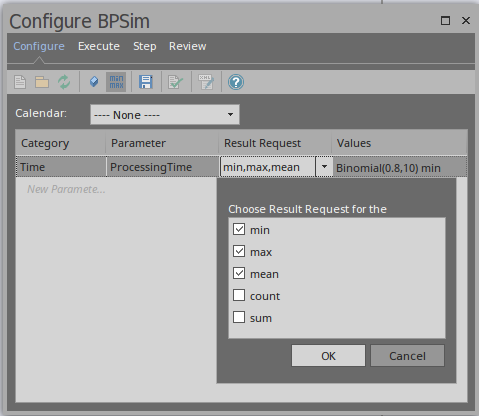
Temporal Parameters
To begin defining Time Parameters,
- Select the element on the diagram, then choose "Time" from Category column in the list
- After the category selection, the combo box in the Parameter column will be filled with all available parameters for the selected element
- After the parameter selection, the user may enter the value in the edit or use the "..." button to open the Parameter Value Dialog.
- The user may toggle Result Request column by clicking the "min/max" button on the toolbar to customize the simulation result by requiring certain result.
Resource Parameters
To begin defining the Resource Parameters,
- Select the BPMN Task element on the diagram, then choose "Resource" from Category and "Selection" from Parameter column
- Click the "..." button to open the "Edit Resource Selection" Dialog
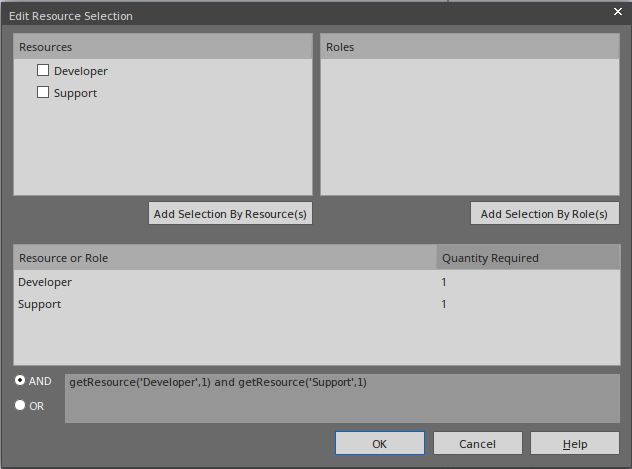
- The top left list will be filled with the defined Resource elements. Use the "Add Selection By Resource(s)" to confirm the selection.
- the top right list will be filled with the defined Roles on the resource elements. Use the "Add Selection By Role(s)" to confirm the selection.
- Edit the number for "Quantity Required" column
- Choose logical relationship "AND / OR" for the selection
- The final expression for Resource selection is composed and displayed in the text field.
Property Parameters
To begin defining the Property Parameters,
- Click on the Property button on the toolbar
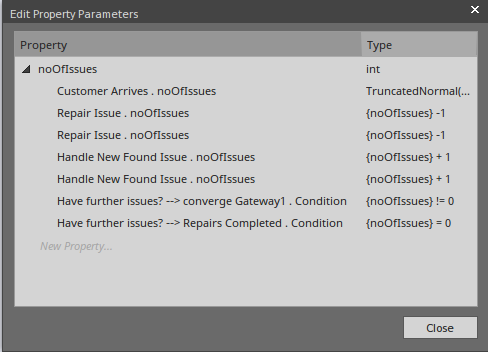
The defined properties and their references are listed.
The user may add a new property, delete the selected property, update property's name and type.
- With the defined properties, the user may set property parameters on BPMN elements:
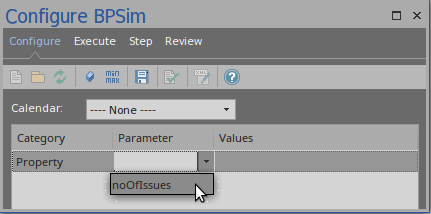
Choose "Property" as category and a defined property for Parameter.
- Click "..." button on the Values column to bring up the Parameter Value Dialog.
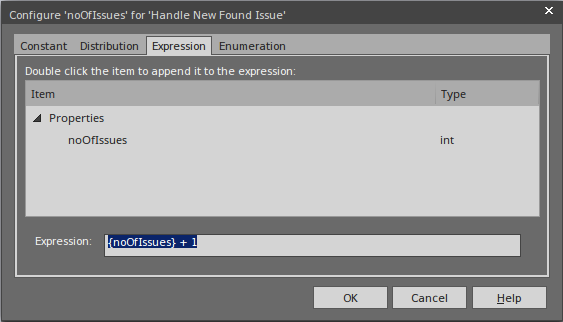
Navigate to "Expression" tab, all the defined properties will be listed and the user may double click on an item to append the property with curly brackets to the edit control. In this example, we compose "{noOfIssues} + 1"
Calendars
With calendars, the user may define any number of special periods of time that can influence the process, such as working days, shifts, holidays or periodic events (for example, stock-taking, inventory or auditing).
To begin defining the Calendars,
- Click on the Calendar button on the toolbar, the defined calendars will be listed.
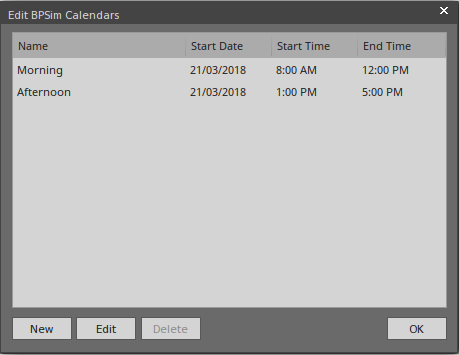
The user may add a new calendar, edit or delete the selected calendar. To add a new calendar period:
- Click on the to display the 'Event Recurrence' dialog.
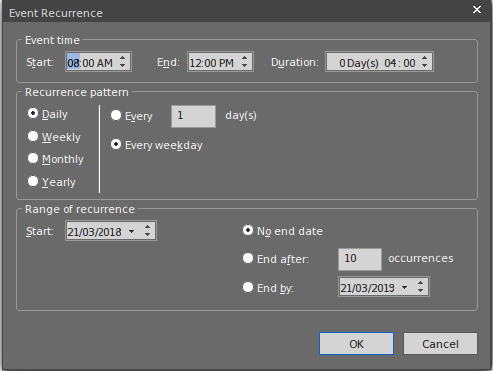
- In the 'Event time' panel, the 'Start' and 'End' fields both default to the current time. The 'Start' field is the anchor; a change to either the 'End' field or the 'Duration' field automatically updates the other field, in reference to the 'Start' field. Click on the hour and minute segments of each field (and, for the 'Duration' field, the 'Day(s)' segment) separately, and use the 'spin' arrows to set the start time and the end time or duration of the period.
- In the 'Recurrence pattern' panel, select the radio button for the interval at which the calendar period recurs. Each option displays an appropriate set of fields in the right of the panel for refining that interval to every day/week/month or every two/three/four days/weeks/months, on a particular day of the week, or day or date of the month, or day or date in the year. Select the checkboxes or values in drop-down lists as appropriate.
- In the 'Range of recurrence' panel, select the date on which the calendar period takes effect and select the appropriate radio button to define when the period ceases to apply - never, after a set number of occurrences, or on a specific date. You can select an end date either from a drop-down calendar or using the 'spin' arrows on each segment of the date.
- Click on the to set the calendar period.
As you define calendar periods, they are listed in order of the start date and/or time, earliest first.
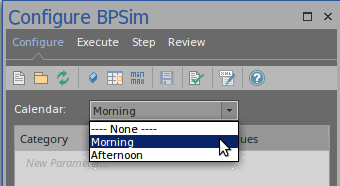
- With defined calendars, the user may configure parameters on a selected calendar
Validation
After configuring BPSim parameters for some BPMN Elements, run the Validation model. Any BPMN or BPSim errors/warnings will be displayed in the System Output window. Fix the issues according to messages.
Then we are ready for the next topic: BPSim Execute Page.
Learn more

