| Prev | Next |
Connect to a Connector
Under certain circumstances, it can be useful to create a connector that issues or terminates (or both) on another connector. For example, you might create a connector between two elements, and then create a link between that connector and a Requirement element to show that the relationship between the two elements was a predefined specification of the design.
In releases of Enterprise Architect from 13.0 onwards, you can add connectors to other connectors. The linking connector can connect as source and target:
- Two other connectors
- An element and a connector
- A connector and an element
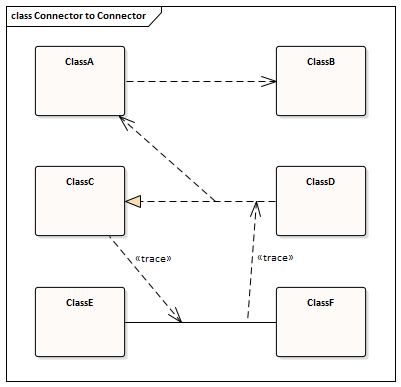
The appearance of each configuration of a connector/connector link is illustrated here:
As you create the connector on another connector, the connector end displays with this circle symbol to indicate that it is on another connector, and to help you position the end accurately.
(Select connector) 
(Move connector end) 
There is effectively no limit to the number of connectors that can issue from or terminate on another connector.
Once you have anchored one connector on another, if you move either end or the whole connector and you have selected the 'Layout > Align >  > Smart Placement' and 'Show smart placement guidelines' options, colored guidelines appear on the diagram. These indicate where the selected end of the connector is relative to potential anchor points on the currently-anchored connector and others that you might drag past.
Create a connector on another connector
You can create a connector that issues from or terminates on another connector in the same two ways as you create one on an element; that is:
- Using the Quick Linker arrow or
- Using a connector icon from the Toolbox
Method |
Action |
See also |
|---|---|---|
|
Quick Linker |
You can also drag the Quick Linker arrow into empty space; a short menu of element types displays and you can select to generate an element of one of those types whilst the system automatically creates an appropriate type of connector to it. |
Create Connectors |
|
Toolbox |
Certain connector types are not UML-compliant for linking to another connector, and if you select such types you might get an error message. You can continue to create this type of connector by de-selecting the 'Strict Connector Syntax' option on the 'Links' page of the 'Preferences' dialog (the 'Start > View > Preferences' ribbon option). |
Diagram Toolbox |

