| Prev | Next |
Responsibilities
The Responsibilities window provides a convenient method of quickly adding, viewing, editing and deleting rules applied to an element. The window shows details of the entities that impose such rules or restrictions on the element, namely:
- The element's scenarios
- The element's internal constraints (not external Constraint notes)
- The element's internal requirements
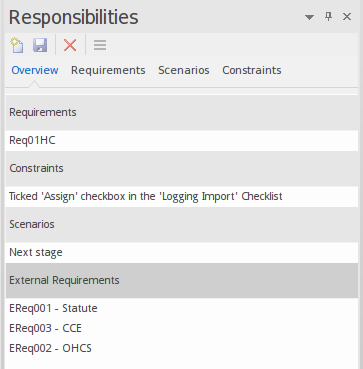
The window also has an 'Overview' tab that lists all the Requirements, Scenarios and Constraints on the selected element, so that you can quickly see what has been defined and select a specific entity for further examination. If you double-click on an entity, its properties are shown on the appropriate tab of the window. The 'Overview' tab also shows any external Requirement elements connected to the selected element.
Access
Select the element in the Project Browser or diagram and select one of these options to display the Responsibilities window:
|
Ribbon |
Design > Element > Responsibilities > <entity type> or Overview |
|
Keyboard Shortcuts |
|
Use of the window
The Responsibilities window is typically used to examine Use Case and Test Case elements, and any other elements that realize an internal Requirement.
For convenience, you can display the window as a dockable window at the edge of your workspace, or as a floating window.
On the 'Overview' tab, you can right-click on one of the external Requirement elements and select to locate it in either the Project Browser or any diagram that contains it. If the element is used in more than one diagram, the 'Element Usage' dialog displays, from which you can select the instance to examine. See the Show Element Use Help topic.
Review an internal requirement, constraint or scenario for an element
Step |
Action |
See also |
|---|---|---|
|
1 |
Select the element in the Project Browser or diagram and select the 'Design > Element > Responsibilities' ribbon option. |
|
|
2 |
Double-click on the item to display. The appropriate window tab displays, with the details of the selected item in the fields. If there is no item of the required type, and you want to create one, click on the corresponding tab ('Requirements', 'Scenarios' or 'Constraints'). |
|
|
3 |
The toolbar icons, from left to right, enable you to:
You can also add or edit formatted notes in the 'Notes' field, using the Notes toolbar at the top of the field. For a requirement, the drop-down arrow to the right of the 'Requirement' field displays a list of existing internal requirements on the element. If you right-click on a requirement in the list, an option displays for converting the selected internal requirement into an external Requirement element. |
Notes Toolbar Converting an Internal Responsibility Into an External Requirement Scenarios Constraints Requirements |
Class1

