| Prev | Next |
Export Requirements to DOORS
Using the Sparx Systems MDG Link for DOORS, you can transfer all the Requirement elements under the selected Enterprise Architect Package to a linked IBM® Rational® DOORS® module, as DOORS objects.
As part of this process you can create an export profile to define what the export should operate on. An export profile is a template in which you specify the Enterprise Architect element properties to be exported to the mapped fields in DOORS object properties. The profile can be reused when you import and synchronize the DOORS project into Enterprise Architect again.
Access
|
Ribbon |
Click on target Package, then: Specialize > Technologies > DOORS > Export to Doors |
|
Context Menu |
Project Browser | Right-click on target Package | Extensions | Doors Extension | Export to Doors |
Export to Doors Dialog
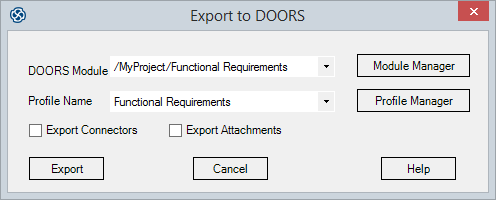
On the 'Export to Doors' dialog you set the module you are exporting into, and specify which export profile to apply and whether to also export connectors and attachments.
Export Options
Field/Button |
Action |
See also |
|---|---|---|
|
DOORS Module |
Click on the drop-down arrow and select the linked DOORS module into which to export the Requirements. |
|
|
Module Manager |
If the required module is not listed, click on this button to display the 'Module Manager' dialog, and locate and link to the module. |
Create a Link to a DOORS Module |
|
Profile Name |
Click on the drop-down arrow and select the appropriate export profile to use in this operation. |
|
|
Profile Manager |
If the export profiles listed are not appropriate, click on this button to display the 'Export Profiles Manager' dialog and create, edit or import the profile. (See the Manage Export Profiles table.) |
|
|
Export Connectors |
Select this checkbox to export any connectors between the Requirement elements. |
|
|
Export Attachments |
Select this checkbox to export any attachments that the Requirement elements might have. |
|
|
Export |
Click on this button to begin the export of Requirements from the selected Enterprise Architect Package to the specified DOORS module. |
|
|
Cancel |
Click on this button to close the 'Export to Doors' dialog without exporting any Requirements. |
|
|
Help |
Click on this button to display this Help topic. |
Export Profiles Manager Dialog
When you click on the on the 'Export to Doors' dialog, the 'Export Profiles Manager' dialog displays. You use this dialog to create or import new profiles, edit or delete existing profiles, and export profiles to your preferred file system.

Manage Export Profiles
Field/Button |
Action |
See also |
|---|---|---|
|
Add |
Click on this button to add a new export profile. The 'Mapping Options' dialog displays; see the Create or Edit an Export Profile table. |
|
|
Edit |
Click on an existing profile name and click on this button to edit the parameters of that profile. The 'Mapping Options' dialog displays, showing the current parameters of the profile; see the Create or Edit an Export Profile table. |
|
|
Delete |
Click on an existing profile name and click on this button to immediately remove that profile from the list. There is no confirmatory prompt. |
|
|
Import |
Click on this button to display the 'Import a Profile - Doors Extension' browser. Browse for the location of the required profile file (.eProfile), and click on the file name and on the . A status message displays. Click on the ; if the operation was successful, the profile name displays on the 'Export Profiles Manager' dialog. If unsuccessful, the profile is not added to the list. |
|
|
Export |
Click on a profile name and click on this button to export that profile to a file system location as a .eProfile file. The 'Save As' browser displays. Browse to the required location and click on the . A status message displays; click on the to clear the message. |
|
|
Close |
When you have finished using the 'Export Profiles Manager' dialog, click on this button to return to the 'Export to Doors' dialog. |
Export Mapping Options dialog
When you click on the or on the 'Export Profiles Manager' dialog, the 'Mapping Options' dialog displays. This dialog maps Enterprise Architect element properties to IBM® Rational® DOORS® Object properties, and helps you to define which properties - including Tagged Value properties - to export. You can use the selected profile many times to update the DOORS module with changes in the Enterprise Architect Requirements.

Create or Edit an Export Profile
Field/Button |
Action |
See also |
|---|---|---|
|
Profile Name |
Type in an appropriate name for the profile (if editing an existing profile, the name of the selected profile displays here). |
|
|
Choose an Action |
Defaults to 'Export'. You can click on the drop-down arrow and change this action to 'Import' if you are switching the direction of the data exchange. |
|
|
Element Type |
Click on the drop-down arrow and select either 'Requirement' or 'Use Case'. |
|
|
Stereotype |
Click on the drop-down arrow and select the type of Requirement or Use Case to filter for. |
|
|
Enterprise Architect |
Lists the Enterprise Architect element properties that could be exported. |
|
|
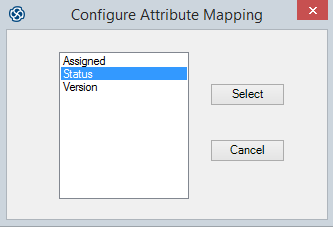
DOORS |
Lists the DOORS properties that can be exported to. Double-click on an empty property field to map that field to an Enterprise Architect property. If there are no available properties, an error message displays; otherwise, the 'Configure Attribute Mapping' dialog displays.
|
|
|
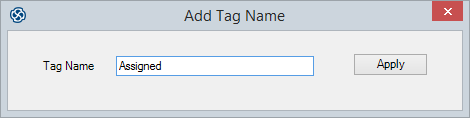
Add Custom Field |
Click on this button to select an Enterprise Architect Tagged Value name to export. The 'Add Tag Name' dialog displays.
|
|
|
Remove |
Click on a DOORS property value and click on this button to clear the value mapped to the corresponding Enterprise Architect property. |
|
|
Save Profile |
Click on this button to save the Profile definition you have created, and close the 'Mapping Options' dialog and return to the 'Export Profiles Manager' dialog. |
|
|
Cancel |
Click on this button to close the 'Mapping Options' dialog without saving any profile data you have entered. |
Learn more

