| Prev | Next |
Create Custom Diagram Profiles
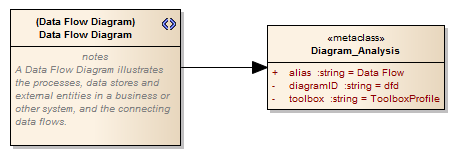
When you develop an MDG Technology, it is possible to create extended diagram types and include them in your MDG Technology as custom Diagram Profiles. For example, you might create a DFD Diagram Profile that defines a DFD diagram as an extension of the built-in Analysis diagram, as shown:
Create extended diagram types
Step |
Action |
See also |
|---|---|---|
|
1 |
Create a Profile, with the same name as the MDG Technology in which it is to be included; for example, SysML. This Profile automatically contains one child Class diagram. Depending on how many new diagram types you intend to create, you can define:
In the third case, create any further child Class diagrams you need. The diagram names do not have to reflect the technology name. |
Create a Profile Package |
|
2 |
Open the child Class diagram and create a Stereotype element, giving it the name of the Custom diagram type; for example, BlockDefinition. Also on the Stereotype element 'Properties' dialog, in the 'Notes' field, type a brief description of what the diagram is used for. When the Technology is deployed and a diagram of this Custom type is being created, this description will display in the bottom right-hand corner of the 'New Diagram' dialog. |
Add Stereotypes and Metaclasses |
|
3 |
Create a Metaclass element and give it the name of the selected built-in diagram type, with the prefix Diagram_. For example Diagram_Logical to customize the Class diagram type, or Diagram_Use Case to customize the Use Case diagram type. |
Built-In Diagram Types |
|
4 |
Drag an Extension connector from the Stereotype element to the Metaclass element. |
|
|
5 |
Click on the Diagram_xxxx Metaclass element, press and create any or all of these attributes, to set properties of the Custom diagram type:
|
Diagram Frame Attribute Values - styleex & pdata |
|
6 |
Depending on what Profile Package organization you adopted at step 1, and whether you need any further Stereotype-Metaclass element pairs, repeat steps 2 - 5 on this diagram or on another child diagram. |
|
|
7 |
Save the diagram(s) as a Diagram Profile, using the method most appropriate to the Profile Package organization you have set up. |
Export a Profile |
|
8 |
Add the Diagram Profile(s) to the .mts file used in the MDG Technology. |
Add a Diagram Profile |

