| Prev | Next |
Sub-Shapes
When you define an element or connector shape using a Shape Script, you can build the shape from separate components, defined as sub-shapes. Using sub-shapes, you can create complex shapes that more closely resemble the objects that they represent.
Sub-shape Layout
To set the layout type you use the layoutType attribute, which must be set in the initialization attributes section of the script; in other words, before any of the methods are called. Valid values for this attribute are:
- LeftRight - Shapes with this layout position the sub-shapes side by side, with the first added on the left, and subsequent sub-shapes to the right
- TopDown - Places the sub-shapes in a vertical arrangement, with the first sub-shape added to the top and subsequent sub-shapes added beneath
- Border - This requires an additional argument to the addsubshape method to specify which region of the containing shape the sub-shape is to occupy: N, E, S, W or CENTER; each region can only be occupied by one sub-shape
A sub-shape that is assigned to the E or W region must have its preferredwidth attribute specified in its declaration and, similarly, sub-shapes added to N or S must have their preferredheight attribute set; in this case, the values for these attributes are treated as static lengths and do not scale glyphs
Example
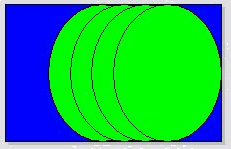
shape main
{
layouttype="topdown";
setfillcolor(0,0,255);
rectangle(0,0,100,100);
addsubshape("sub",50,100,20,0);
addsubshape("sub",50,100,30,-100);
addsubshape("sub",50,100,40,-200);
addsubshape("sub",50,100,50,-300);
shape sub
{
setfillcolor(0,255,0);
ellipse(0,0,100,100);
}
}
The script defines this shape: